Payments with Google Pay
- benamchin
- Nov 12, 2022
- 4 min read
The newest installation in Microsoft Dynamics' ability to take wallet payments is Google Pay. In this blog we'll go through the way to set it up on the web so that we can take payments through Google Pay.
Adyen - Payment Methods
The first thing that we need to do is go into our Adyen account and go to our Moto/Ecom merchant account. In the settings section, click Payment methods:

In the payment methods, you'll select "Request payment methods" in blue on the top-right, then find and select Google Pay. Your end result should look something like this:

You'll also need your merchant accounts client ID and key in order to configure the next parts. To find those, follow my blog on how to set up Adyen for credit cards here.
Dynamics Configurations
There are a handful of things that we need to configure in D365 to get this to work. We'll start with the payment piece, move to the online store, and then we'll be all set.
Payment Method
The first thing we need to configure is a retail payment method. Navigate to Retail and Commerce > Channel setup > Payment methods. Create a new record and call it whatever you'd like. For simplicity's sake I've named mine Google Pay. Set the payment methods default function to Wallet, then you're all set. It should look like this when complete:

Card Types
We need to set up card types for wallet payments and set up the processor mappings. Navigate to card types (Retail and Commerce > Channel Setup > Payment methods > Card types) and create a new record. Again, for simplicity's sake I've named mine GooglePay. Set the type to Wallet, and set the Issuer as Google Pay. It'll look like this when you're done:

Once you've saved the record, you'll click on Process mapping in the ribbon.
Processor Mapping
In the processor mapping screen, on the left-hand side select the card type Google Pay. In the middle column, add all of the processor payment methods that have a connector of "Dynamics 365 connector for Google Pay" and press the add button. The final result will be a lot of records connected to Google Pay on the right-hand column:

Press OK and you're all set here.
Online store
On the online store, you'll need to set up a few things. First, we can start with the basics. Make sure that you add your payment method in the setup > payment methods in the ribbon. When you do that, select Pay card as the operation and choose the connector for Google Pay. Next make sure to add the electronic payment method (the card type) to the payment method.


After that you'll need to configure the payment service that will be the gateway to the Google Pay processor.
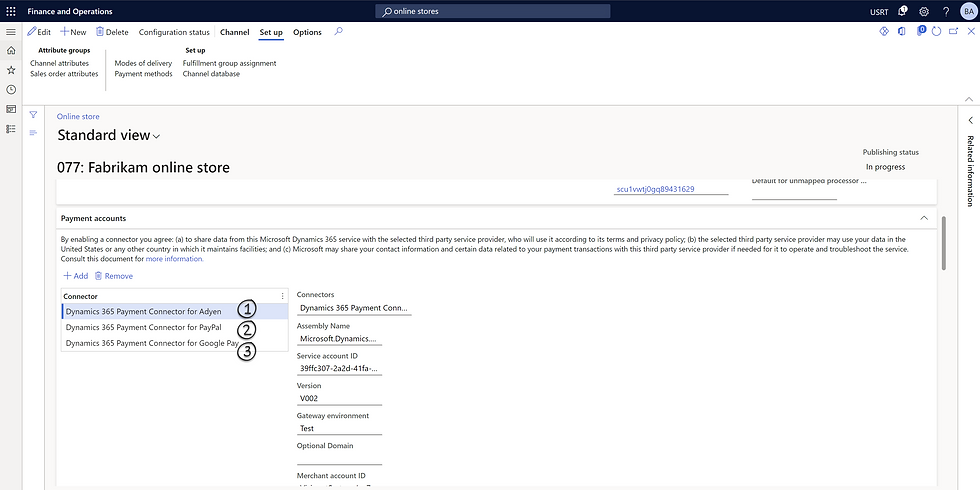
In the Payment accounts section of the online store, add a new record and select the payment connector "Dynamics 365 Payment Connector for Google Pay" and make sure that it's after the connector for Adyen if you have one. It'll looks something like this:

In the payment connector for Google Pay, you'll need to use your merchant account and client ID from your Adyen account that we gathered when we were setting up the payment method.
The other thing to do is make sure that you set the account to TEST, otherwise you run the risk of running actual credit card (testing this is scary, I'll explain later). It'll look like this once complete:

Once that's done, just push 1070 to the channel database and you're all set from a D365 back office perspective!
Site Builder
The last thing we need to do is add the payment option in site builder.
Extensions
The first thing that needs to happen is we need to enable single payment authorization at checkout. This is a checkbox in the Extensions section of your site builder. Navigate to the Extensions section like this:

Save and publish this, then we'll be able to use Google Pay after we add it to the checkout fragment.
Checkout Fragment
Last, we need the actual button to select when checking out. To create this, go to your checkout fragment. Here, we'll add a new module for Payment.
I always name my modules something unique, so change the name here to Google Pay as well as the property to Google Pay. I like to set the height to 60 as that fits the whole button without a lot of white space underneath it. In supported tender types, enter GooglePay (has to be one word) and uncheck (if checked) the "Is primary payment" flag:

The last thing you'll need to do is scroll down and select the "Use connector ID" checkbox.

Save your changes and publish the fragment.
If everything is done correctly, you should see something that looks like this when you get to check out (depending on where you put your buttons it may look differently):

Testing Google Pay
One thing that's unique about testing this is that there is no test card or account to be used. You'll need to use a real credit card, then the system will automatically switch it over to an Adyen test credit card.
Yes, I know it's scary, but trust me I've tested this with thousands of dollars of transactions on my site and it works just fine. I'm not paying for virtual shoes with my real money.


Comments